Since 1916, when President Woodrow Wilson signed the act creating the National Park Service, this incredible system has grown to include 63 national parks and hundreds of other protected areas. These parks are home to towering peaks, lush forests, arid deserts, and stunning coastlines—all waiting to be explored.
No matter how long you plan to be on vacation, preparedness is key. Once you’re out in the wilderness, there’s no running back home for forgotten gear. That’s why we’ve put together this list of packing essentials. Consider it your ultimate guide to everything you'll need for a safe and comfortable national park adventure.
💡 PRO TIP: Grab a Passport To Your National Parks booklet from the National Park Service. Not only does it help you find other NPS destinations, but it's also a fun way to track your visits and makes a great souvenir. Passports are available online and at most National Park visitor centers. Read our related article to learn more.
Packing list for national parks: the absolute essentials

Simplicity is key with national park adventures. Resist the urge to overpack—focus on bringing only what you truly need. A well-thought-out packing list not only lightens your load but also enhances your experience by allowing you to fully immerse yourself in the beauty around you. Remember, the goal is to enjoy the natural world with an open mind and a spirit of curiosity.
Here’s a curated list of what to bring to a national park:
1. Comfortable shoes
Let’s talk about shoes—because nothing ruins a hike faster than sore feet or blisters. You wouldn’t show up to climb a mountain in flip-flops, right? Footwear tops our list of national park essentials because it will significantly impact your wilderness experience.
Here’s what to keep in mind:
- Support Matters: Look for shoes with good arch support and cushioning to keep your feet happy on long trails. If you want extra comfort, toss in a pair of insoles.
- Break Them In: New shoes? Wear them around the house or on short walks before your trip. Breaking them in ahead of time means no nasty surprises (or blisters) on the trail.
- Pack Smart: Bring one pair for hiking and another for kicking back after a long day. Alternating shoes gives your feet a chance to breathe and recover.
If you’re tackling rugged terrain, consider wearing military boots; they’re built to handle tough conditions without weighing you down. Trust us, your feet will thank you.
2. Extra clothing
Weather in national parks can be unpredictable—one minute it’s sunny, and the next, you’re dodging raindrops or shivering in the shade. That’s why packing extra clothing isn’t just smart—it’s essential. The key is to focus on versatility and protection.
Here’s what to bring:
- Base Layers: Start with moisture-wicking fabrics like merino wool or synthetic materials. These keep you cool when it’s hot and warm when it’s cold. For example, a lightweight long-sleeve shirt is perfect for sun protection and temperature regulation.
- Insulating Layers: When temperatures drop, you’ll want something cozy. A fleece jacket or down vest will keep you warm without adding bulk.
- Outer Layers: Always pack a waterproof and windproof jacket. Look for one that’s breathable too, so you don’t overheat during hikes. If you’re heading somewhere rainy, consider adding waterproof pants as well.
- Footwear Extras: Never underestimate the power of dry socks. Pack at least one extra pair, preferably made from wool or synthetic materials that wick moisture and prevent blisters.
- Accessories: Don’t forget a hat (for sun or warmth), gloves (if it’s chilly), and a buff or scarf for added versatility. These small items can make a big difference when conditions shift.
Most importantly, always pack a trusty jacket and an extra pair of socks. They can save you when the weather gets bad.
3. A Quality Backpack
You’re not going to carry all your gear in your hands, right? A good backpack is essential on any national park adventure. It keeps your essentials organized, accessible, and—most importantly—off your shoulders (literally).
Here’s what to look for:
- Day Hikes: If you’re sticking to shorter trails, a 20-30 liter daypack should suffice. Look for one with padded straps and a hip belt for comfort.
- Multi-Day Trips: For longer adventures, go for a larger pack (50-70 liters) with compartments for your tent, sleeping bag, and food. Make sure it has a sturdy frame to distribute weight evenly.
- Features to Love: Whatever size you choose, prioritize features like hydration reservoir compatibility, external attachment points for trekking poles or gear, and weather-resistant materials.
Read this article about hiking backpacks to find the right one according to size, carrying capacity, and what type of hike they are best for.
💡 PRO TIP: Test your backpack before you leave. Pack it with all your gear and take it on a short walk to make sure it feels comfortable and balanced. A poorly fitting pack can ruin even the shortest hike.
4. Reusable Water Bottle
When you're out exploring national parks, staying hydrated is essential. Particularly at higher elevations or in hot climates, dehydration can quickly catch up with you. That’s why a reusable water bottle is one of the most important items on your packing list.
Here’s how to stay hydrated:
- Size Matters: Bring a bottle that holds at least 32 ounces so you don’t have to refill constantly. Wide-mouth bottles are easier to clean and fit ice cubes if you need them.
- Eco-Friendly Choices: Opt for durable, BPA-free materials like stainless steel or aluminum. These keep your water cold (or hot) and won’t break down over time.
- Refill Stations: Many national parks have water refill stations near visitor centers and trailheads. Check ahead to see where they’re located so you can plan your stops.
💡 PRO TIP: If you’re hiking in extreme heat, consider bringing two bottles or a hydration bladder. You’ll thank yourself when you’re miles from the nearest refill point.
5. Water Sterilization Equipment
Even if you’re planning to stick to marked trails, access to clean drinking water isn’t always guaranteed. Despite their apparent clarity, streams, lakes, and rivers can harbor harmful bacteria and parasites. That’s where water sterilization equipment comes in.
Here’s what works:
- Filters: Portable filters like the Sawyer Squeeze or LifeStraw are lightweight and effective at removing bacteria and debris from natural water sources.
- Tablets or Drops: For a no-fuss option, iodine tablets or chlorine drops are inexpensive and reliable. Just remember they can leave a slight aftertaste.
- UV Sterilizers: The Crazy Cap water bottle uses UV light to kill 99.9% of germs in seconds. It’s compact, easy to use, and perfect for backcountry adventures. We have one and love it!
💡 PRO TIP: Always test your sterilization method at home before your trip. Knowing how it works—and having backups like extra batteries or spare tablets—ensures you’re never caught without safe drinking water.
6. Maps
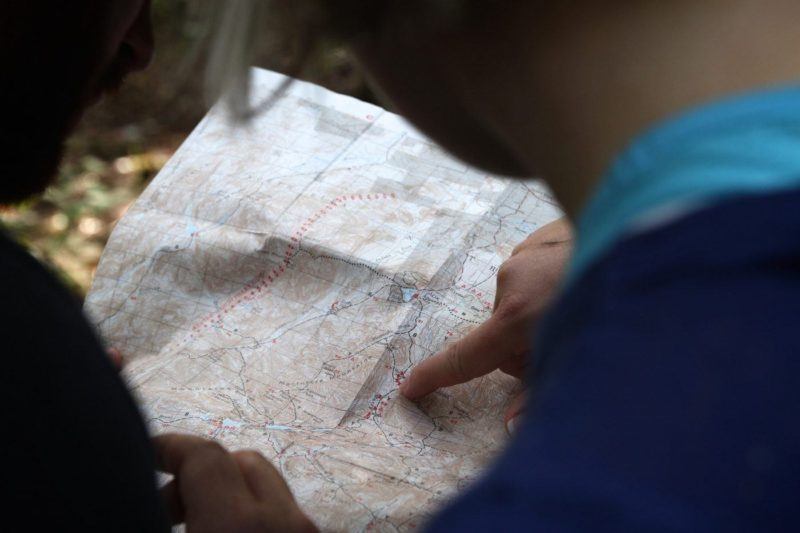
Don’t rely on your phone—cell service is notoriously unreliable in most national parks. A physical map is one of the simplest yet most essential tools you can bring. It doesn’t need batteries, it won’t break if it gets wet (if it’s laminated), and it works even when you’re miles away from civilization.
Before your trip, download offline maps or pick up trail maps and topographical maps for the areas you plan to explore.
Here’s how to use them effectively:
- Study the map before you start your hike. Look for key landmarks like rivers, peaks, or trail intersections that can help you stay oriented.
- Mark your planned route with a pencil or highlighter so you can easily follow it while on the trail.
- Keep the map in a waterproof bag or sleeve to protect it from rain or sweat.
7. Compass
An old-school compass is an indispensable backup tool. Even if you’re confident in your ability to navigate with a map, a compass adds an extra layer of security. Pair it with your map, and you’ve got a navigation system that doesn’t depend on cell towers or GPS signals.
Here’s what to know:
- Learn the basics of using a compass before your trip. Practice orienting your map and taking bearings at home—it’s easier than it sounds.
- Choose a simple, durable model that’s easy to read. You don’t need anything fancy, just something reliable.
- Attach it to your backpack or jacket with a cord so it’s always within reach but won’t get lost.
If you’re hiking in an area with limited visibility—like dense forests or foggy mountains—a compass can be a lifesaver. Combine it with your map to pinpoint your location and stay on course.
8. Snacks
Hiking burns a ton of energy, and hunger can sneak up on you fast. Whether you're going on a day trek or a multi-day expedition, it's important to include snacks that will keep you energized and focused. Think portable, nutrient-dense foods that are easy to eat on the go.
Here’s what to pack:
- Nuts and seeds: Almonds, cashews, or trail mix provide healthy fats and protein to keep you going.
- Dried fruit or jerky: These are lightweight, calorie-dense, and pack a punch of energy.
- Dark chocolate or energy bars: Not only do they taste good, but they also give you a quick morale boost when you’re feeling tired.
- Fresh fruit: Apples, oranges, or bananas are great for shorter hikes when you don’t need to worry about spoilage.
💡 PRO TIP: If you enjoy coffee or tea, consider bringing a portable infuser like the Mosi All-in-One Infuser. We really like ours! It lets you brew hot or cold beverages on the go, so you can keep your caffeine cravings at bay. Use this link to get 10% off your purchase.
9. First aid kit
Even on well-marked trails, accidents happen. A compact first aid kit ensures you’re prepared for minor injuries like cuts, scrapes, blisters, or bug bites. While it’s tempting to grab a pre-made kit, customizing your own ensures you have exactly what you need without unnecessary extras.
Here’s what to include:
- Any personal medications you might need, like allergy pills or an EpiPen
- Bandages and blister pads for minor cuts and hotspots
- Antiseptic wipes and hand sanitizer to clean wounds and keep germs at bay
- Tweezers for removing splinters or ticks
- Pain relievers like ibuprofen or acetaminophen for headaches or sore muscles
Tailor your kit to the length and intensity of your trip. A small kit with the basics will do if you're just hiking for the day. For longer adventures, you may want to include items like a compression bandage, moleskin for blisters, and a small roll of duct tape for gear repairs.
10. Sunscreen
Sunburn isn’t just uncomfortable—it can ruin your trip and increase your risk of long-term skin damage. Even on cloudy days, UV rays can penetrate through the clouds and cause harm. That’s why sunscreen should always be on your packing list, no matter the season or weather.
Here’s how to choose it and use it:
- Look for broad-spectrum protection to shield against both UVA and UVB rays.
- Opt for SPF 30 or higher for adequate coverage, especially if you’re hiking in midsummer or at higher elevations where UV exposure is stronger.
- Choose reef-safe formulas if you’re visiting parks near water, as traditional sunscreens can harm aquatic ecosystems.
- Apply sunscreen 15-20 minutes before heading out, and don’t forget often-missed spots like the back of your neck, ears, and the tops of your feet.
- Reapply every two hours—or more frequently if you’re sweating or swimming.
11. Insect repellent
Bug bites aren’t just annoying—they can carry diseases like Lyme disease or West Nile virus. Insect repellent is a must-have, especially if you’re visiting parks with dense forests, marshes, or wetlands where mosquitoes and ticks thrive.
Here’s what works:
- DEET-based repellents are highly effective against mosquitoes, ticks, and other biting insects.
- Picaridin is a gentler alternative that’s odorless and safe for kids.
- Natural options like citronella or eucalyptus oil can work for short durations but may need frequent reapplication.
Apply repellent to exposed skin and clothing, avoiding sensitive areas like your eyes and mouth. For added protection, treat your gear with permethrin spray—it repels bugs and lasts through several washes.
12. Protective hat
A good hat is one of the simplest ways to protect yourself from the elements. It shields your face, neck, and ears from the sun while also helping regulate your body temperature. Depending on where you’re headed, the type of hat you bring might vary.
Here’s how to choose:
- Wide-brimmed hats are ideal for sunny environments, offering maximum coverage for your face, neck, and shoulders.
- Ball caps are lighter and more breathable but may leave the back of your neck exposed—pair them with sunscreen or a bandana for extra protection.
- Wool or insulated beanies are perfect for colder parks, keeping you warm without adding bulk.
💡 PRO TIP: If you’re hiking in hot weather, soak your hat in water before heading out. As the water evaporates, it’ll help cool you down—a game-changer in scorching climates like Death Valley or Big Bend.
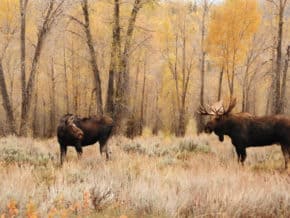
13. Binoculars
Binoculars might not seem like an obvious choice for your national park packing list, but they can make a huge difference when you’re out exploring. Imagine spotting wildlife in the distance—a bear, an elk, or even a rare bird—and being able to see it up close without disturbing its natural behavior.
I remember the time we saw a large, black animal in the distance while hiking through Ocala National Forest. We were pretty sure it was a bear but couldn't be sure because we didn't have binoculars. Don't make the same mistake!
Here’s what to look for:
- Lightweight Design: You don’t want bulky gear weighing you down on the trail.
- Waterproof and Fog-Proof: Weather conditions can change quickly, so opt for a pair that can handle moisture.
- Magnification Power: Choose binoculars with 7x to 12x magnification for clear views without too much shakiness.
Pro Tip: Compact binoculars are perfect for hiking because they fit easily into your backpack or pocket. Look for models specifically designed for outdoor adventures—they’re often more durable and reliable.
14. National Parks Pass

An America the Beautiful Parks Pass is your ticket to more than 2,000 federal recreation sites. Each pass covers entrance fees at national parks and national wildlife refuges as well as standard amenity fees (day use fees) for
Visit thefor details and information on how to purchase a pass online.
If you’re planning to visit multiple national parks or federal recreation sites, an America the Beautiful Parks Pass is one of the smartest investments you can make. One pass covers a driver and all passengers in a personal vehicle.
This pass grants access to over 2,000 federal recreation sites, including all national parks, national wildlife refuges, and standard amenity areas like picnic spots and boat launches.
Why it’s worth it:
- Cost-Effective: At $80 per year, it pays for itself after just a few visits.
- Convenience: No need to pay individual entrance fees each time you visit a park.
- Supports Conservation: Your purchase helps fund maintenance and preservation efforts across the national park system.
Visit the USGS Online Store for details and information on how to purchase a pass. If you’re a frequent visitor, this is one of the most practical national park travel tips you’ll ever get.
💡 PRO TIP: Need your pass sooner than two weeks? Some locations issue passes onsite: Click here for the list.
15. Sunglasses
Sunglasses are an absolute necessity when you’re out and about. Whether you’re hiking under the desert sun or trekking across snowy alpine meadows, you need to protect your eyes from harmful UV rays.
Here’s what to look for:
- Polarized lenses reduce glare, especially near water, snow, or reflective surfaces like sand and rocks.
- UV protection is non-negotiable. Make sure your sunglasses block 100% of UVA and UVB rays.
- A snug fit keeps them from slipping off during physical activity. Look for wraparound styles or ones with rubberized nose pads for extra grip.
💡 PRO TIP: If you wear prescription glasses, consider getting prescription sunglasses or clip-on shades. You can also use contact lenses paired with regular sunglasses for convenience.
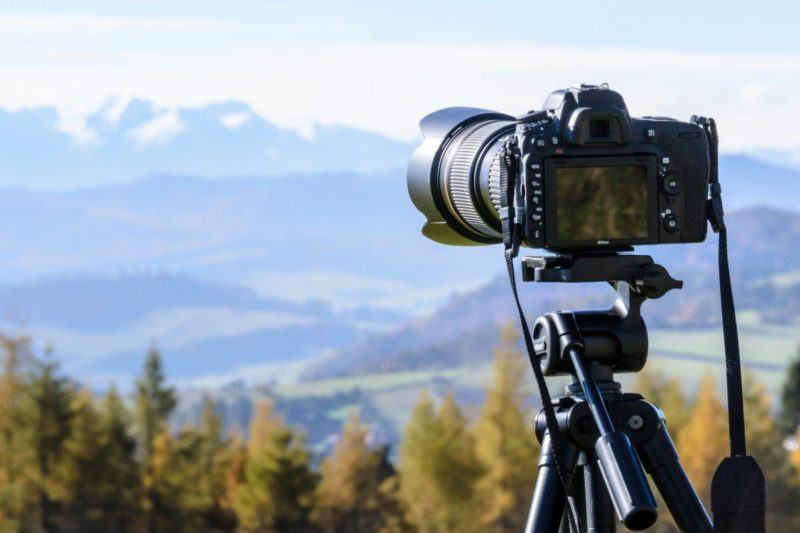
16. Photo equipment
Of course, you will want to document your trip to the national parks you visit. While you can simply rely on your phone to capture some of the most memorable moments, once you get to the top of that beautiful peak where the sun is setting over the distant horizon, you might wish you had brought along your tripod and DSLR camera to help you better capture the beauty before you.
Some basic photo equipment and a good camera bag won't add much weight to any pack and will allow you to save your memories for ages.
ⓘ TIP: Remember to bring backup batteries and extra memory cards for your camera.
Camping in U.S. National Parks: Gear to bring
When heading to the national parks, camping is almost a necessity. Unless you are going for some winter exploring when temperatures can be well below freezing (not exactly camping weather, IMO!), sitting around a campfire while listening to the sounds of coyotes howling underneath the starry sky is an experience that you won't want to miss.
When packing, then, you will want to bring along some basic camping equipment to enjoy those nights under the sky. Just remember to pack light.
If you are not selective about what type of camping equipment you bring, however, you will quickly find that you'll have to bring along a trailer just to pack the hundreds of camping products that are on the market today. And when you get to the campground, it might take you longer to set up camp than the actual time you get to spend enjoying the evening.
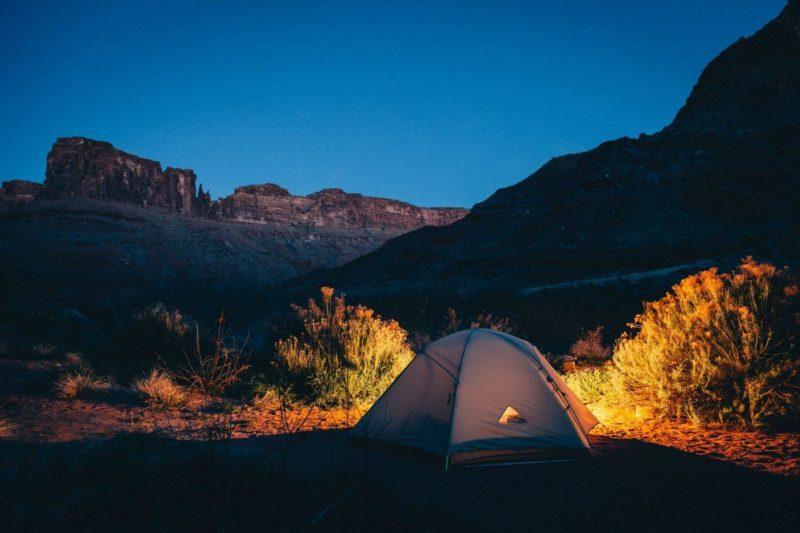
Camping equipment checklist
Every basic camping equipment checklist should include:
17. A tent
Make sure to find one that has a quality rain fly that can be removed during fair weather. You'll want to enjoy the clear, starry night sky before falling asleep. Read this article for tips on choosing the best backpacking tent.
18. Sleeping bags
Research the average nighttime temperatures for the area where you are planning to go. There is no reason to bring along your minus-20 sleeping bag if you're heading to the Grand Canyon, where all you'll need is a lightweight sheet.
19. Fire-starting equipment
Camping without a campfire is like going to an outdoor concert where the speakers don´t work. If you head to an area where rain is common, finding dry kindling to get your campfire started can be a challenge. Bring along some sort of fire starter so that you can enjoy the warmth of a campfire without smoking yourself out.
20. LED battery lantern
While enjoying the dark night sky is certainly a special moment for any authentic camping experience, it is also nice to have a bit of light, especially for those long family dinners while playing cards around the picnic table. The old-time kerosene lanterns work but will leave your camp with that peculiar smell of gas. Today's LED battery lanterns are energy efficient and will easily give you enough nighttime light on one battery charge for the whole of your vacation.
ⓘ TIP: If you plan on sleeping four people, consider getting a six-person tent or going with an even larger one. It takes the same amount of time to set up, but that little extra space can go a long way on comfort and won't add any significant weight to your packing.
Headlamp or Flashlight
Having a headlamp or flashlight is essential for safety, even if you don't plan to hike at night. Trails can get dark quickly, especially in forested areas or narrow canyons, and having a reliable light source ensures you won’t get caught off guard.
Here’s what to pack:
- Headlamps are hands-free and perfect for nighttime navigation, setting up camp, or rummaging through your bag.
- Flashlights are great backups but require you to hold them, which can be inconvenient when multitasking.
- Extra batteries are a must—cold temperatures and extended use can drain power faster than expected.
💡 PRO TIP: Test your headlamp or flashlight before your trip to make sure it’s working properly. Keep it easily accessible in your backpack or jacket pocket so you’re not fumbling around in the dark if you need it unexpectedly.
- Our guest author's website, Live Once, Live Wild, is a good resource for lovers of the outdoors.
- National Parks of America: Experience America's 59 National Parks (Lonely Planet)
- National Geographic Guide to National Parks of the United States
- Moon USA National Parks: The Complete Guide to All 62 Parks by Michael Joseph Oswald
National parks are spectacular but I hope to tempt you to come to New Hampshire and esxperience the White Mountain National Forest!
Carved out by glaciers, it’s gorgeous from the air, on foot or horseback!
As an experienced (OLD) hiker, I’d like to suggest adding a pair of cheater glasses from the Dollar Store to your backpack. Maps and GPS are great IF you can read them! 🙂
Happy and safe travels to you!
Teena from NH
Thanks for the reminder, Teena. The White Mountains are indeed a beautiful destination.
Don’t forget to pick up a national parks passport! It doesn’t actually function like a passport, so I doubt you’ll get any special treatment or anything for having one. But it IS a great way to keep track of which parks you’ve been to and which you still need to experience. In my experience, park rangers love seeing them, as they know the holder is someone who’s very interested in the lands they watch over. It’s a great way to inject a little more fun into the national parks experience!
The National Parks Passport is an excellent resource! We bought one for each of our children (and ourselves!) years ago and it was one of the best souvenirs we could have chosen. We had such a wonderful time filling them up as a family that we even have an article about it: Use This Trick to Visit More of America’s National Parks.
Thanks for the recommendation, Graham.